How To Install Artificial Grass Over Concrete
Are you sick of staring at that ugly concrete space? Or perhaps you want to transform it into a place where kids and pets can play? We’ve got your back!
This guide covers installing artificial grass over concrete or asphalt. If you’re looking to install over soil then check out our comprehensive guide here. We’ve also created guides for installing artificial grass over paving stones and wood decking.
The very good news is that installing artificial grass over concrete is usually a lot easier than installing it over soil. This is because there is a lot less work to do preparing the ground.
However… yes there is a “but”! Your concrete area needs to be in relatively good shape and have good drainage. Read on to learn more!
Who is going to use the finished space?
The type of artificial grass you choose will depend on who is going to use the space. If there is likely to be heavy foot traffic then we’d suggest a shorter pile. If the area will be used by pets then good drainage is key. If it’s a pool surround then you might choose a longer pile for a softer feel.
Our comprehensive artificial grass buying guide will help you choose the right grass for your needs.
When installing on concrete, a key consideration may be how much cushioning the artificial lawn will give. Concrete is quite hard! If kids will be running and playing in the space, then you may consider adding a shock pad underlay. Alternatively, choose a grass with a longer pile and thicker thatch, and consider adding infill after you have installed the artificial grass. If cushioning is a concern, then check out our guide to artificial grass infill.
Measure and plan
Before you start, take some measurements and identify any existing issues with the space you are planning to turf. If you’ve done some DIY before then you’ll know that it’s all about the preparation! Take your time on this important step.
Grab a measuring tape and take accurate measurements of the space. If it’s an irregular shape, then sketching it out on graph paper will really help. You’re looking to identify the major dimensions (width and length) and also the area in square feet.
You need to know the major dimensions so that you know how much artificial grass to buy, and how much adhesive (and underlay if you choose to use this). For larger installation like lawns, we’d recommend buying artificial grass in rolls. Each roll has a length and width.

If possible you should try to buy a roll that is wide enough to fill your space. This is to avoid having to manage joining the edges (seams) of two rolls. Joining seams is a tricky task, and if your installation is big enough to require this, then we’d recommend getting a professional to install the artificial grass for you. If you’re really keen on giving it a go, check out our guide to joining seams.
While you are planning, it’s good to know that artificial grass has a pile direction, much like carpets. This is to do with how the artificial grass is manufactured. Pile direction is the natural lean of the grass blades, and is typically in line with the direction artificial grass is rolled. If your space has a main viewpoint, for example looking from your house into your back yard, then plan to have the pile direction in line with this view. This is not mandatory, but artificial grass looks best when viewed this way.
Confused? Just imagine standing at the viewpoint (your house) an unrolling carpet in the direction of your yard. This is the direction in which the artificial grass roll should be laid.
Next calculate the area of your space on square feet. Area is simply width in feet multiplied by length in feet. If you have an irregular space, use graph paper to help calculate the area.
Smooth and flat
The first consideration is whether your surface is smooth and flat.
When we say “smooth” we mean that it doesn’t have lumps or cavities in it. This is important because there will likely show in the laid lawn. If the imperfections are sharp or large then they may cause this area of the artificial grass to wear prematurely. If your surface is in poor condition then it’s wise to put some effort into repairing it before laying the artificial grass.
If there are lumps then you can try to abrade them away with either a wire brush or an angle grinder. If the surface is concrete and it is broken up, you can repair it using a small amount of concrete. If the surface is asphalt then you can repair using some asphalt crack filler.
If you still can’t get to a smooth surface, then we’d recommend using an artificial grass underlay to protect the artificial grass from wear.
What’s the drainage like?
If you’re installing your own artificial grass, then you’ll already know what the drainage is like for the area where you are looking to install it.
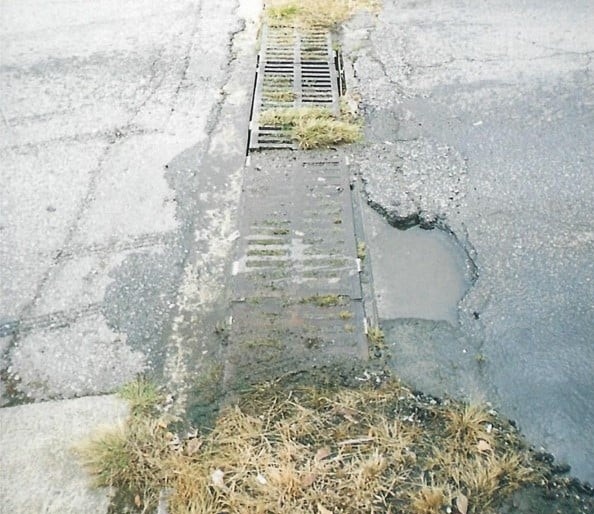
The good news is that if your concrete area has been professionally installed, then it’s very likely that it already has good drainage. This may be in the form of a slight slope allowing water to drain off one side. Or the surface may slope inwards towards a plastic or metal grate, with pipes under the ground channeling the water away.
However if water pools after rain, this is a sign that the area has poor drainage. If you install your artificial grass without remedying the situation then you will also get water pooling on the artificial grass.
If you have drainage issues, drill holes through the concrete with a hammer drill and a 5/8” masonry drill bit. Fill the drilled holes with pea gravel. Drill the holes in the area where the water pools. There is no hard and fast rule for how many holes you need. We’d suggest drilling every foot or so, and then soaking the area with a hose to see how well it drains. If necessary, drill more holes.
Clean and dry
If the surface is smooth and flat and has good drainage, then you’re almost ready to make a start!
Sweep the area out to remove any dust or debris. If there are oily stains then use a good quality stain remover – oil stains may work their way through the artificial grass over time.
Make sure that the surface is thoroughly dry before commencing work.
Lay out and cut to size
As with all artificial grass installations, it’s a good idea to leave the grass roll outside for a few hours to warm in the sun. This will allow it to lay flat rather than keeping its rolled shape. The same applies to foam underlay if you are using this in your project.
Before unrolling the artificial grass, choose a reference edge for your installation. We will line this edge up first, and then cut the artificial grass to align with the other edges. Pick the most noticeable edge (usually the edge one the side where the house is).
Unroll the artificial grass into the space, and align one side to the reference edge. Now take a sharp knife and trim the artificial grass around the other edges. Make sure that the artificial grass is laying flat.
If possible, cut the artificial grass a couple of inches too large. This may not always be possible, but if you can do this then it’s great cheap insurance in case of mistakes later on…
If you are going to apply an underlay, then complete the above and below steps for the underlay first, before repeating for the artificial grass. So, cut the underlay to size and glue it to the concrete, and then do the same with the artificial grass. The underlay is more forgiving than the artificial grass, as you can easily hide any mistakes or gaps.
Apply the adhesive
Once it is trimmed to size, take the artificial grass reference edge and fold the artificial grass back over itself. You should now have half of the concrete exposed, and in the other half you should be looking at the back of the artificial grass. If you have a large area, you may need to weight the unfolded half down to stop it from moving when you fold and unfold the other half (this will make more sense after you have read the following paragraphs!).
Mix up some of the adhesive. Depending on the size of the lawn and the cure time of the adhesive, you may choose to mix up enough to cover only the area you are working on (half of the area).
Using a plastic spreader, smooth the adhesive evenly over the area. A good approach is to pour evenly-size dollops of adhesive at regular intervals, and then use the spreader to smooth them out.
Next carefully roll the folded half of the artificial grass over the concrete with the adhesive. Check that the reference edge is aligned, and if not quickly make the necessary adjustments. You should now have half of your lawn laid onto the concrete.
Repeat the same process for the other half of the artificial grass.
If you have followed our advice above and cut the artificial grass a couple of inches too large, then you can now go around the edges with a sharp knife and trim it to size.
Wait for the adhesive to cure…
Finishing steps
Now that the artificial grass is installed over the concrete, you can complete the finishing touches.
If you have chosen to use an infill, now is the time to apply it and brush it in. If you’re not sure what infill is or whether you need it, check out our guide artificial grass infill.
Otherwise, you may want to fluff up the piles by giving the area a going over with either a stiff brush or a power brush. It’s likely that the artificial grass blades are lying flat after being rolled up, giving them a good brush will encourage the blade to stand up and the grass to look its best!
Congratulations on installing your own artificial grass over concrete!
Tools & Materials
Tools you’ll need to complete this project:
- A sturdy sharp knife to cut the artificial grass
- A mixing attachment and a drill for mixing the adhesive (very useful but optional)
- A plastic spreader for the adhesive
- A stiff broom or power brush.
Materials:
- The right amount of artificial grass (on a roll)
- Foam underlay (optional)
- The right quantity and type of adhesive
- Infill material – either a specialist material or dried sand